Before we go further, you need to know an important distinction: Generally, all computer graphics are raster files, or vector files. You need software that can work with both. Now for an explanation. A raster image is made up of little dots, called pixels. Even if the image contains smooth lines and such, these lines are made up of a bunch of dots right next to each other. If you enlarged the image a lot, the pixels get larger, and the lines become "jaggy" on the edges.
A vector image won't get jaggy on the edges because it is made a different way. Years ago, maybe as early as the 1960's, the team at Hewlet Packard developed a graphics language called HPGL1. This stands for Hewlet Packard graphics language one. They devised a grid system, with 4000 incriments per inch. This grid is part of every vector image, but is seen only by the computer. Your drawing lays on this grid. Let's say that you have a curved line that starts at point 2A, then moves to 2B, then 3A, then 3B. These numbers are places on the grid. When you save the vector file, the computer remembers how your lines intersected the places on the grid. Here's the neat part: when you enlarge the vector file, it's all math to the computer. It enlrges the grid that your lines are drawn on, and the lines themselves. All your lines stay smooth, instead of jaggy, because the computer remembers the lines as mathematical calculations, part of a grid. There are no dots, just lines, that can be made bigger or smaller.
Although Gimp and Inkscape can both work with vector and raster files, we'll be using Gimp to edit raster images, and Inkscape to edit vector images. Something important: whenever you're working with an image, you can do all kinds of experiments ( a great learning process) but remember to click file>save as, and give your experimental image a different name than it was when you opened it. That way, you won't have altered you original version of the image, you'll have both.
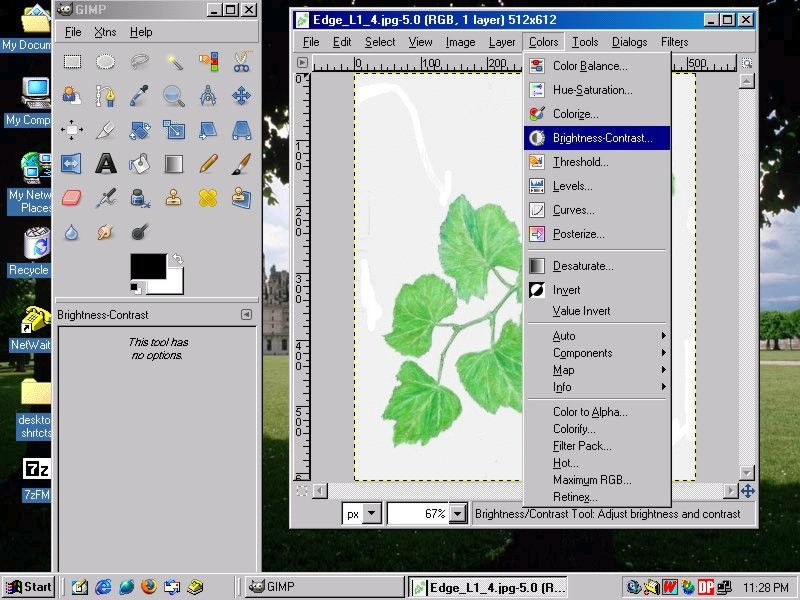
Open Gimp, and see if you can open your scanned image of the grapevine you drew, and experiment with different tools from the toolbox. Try colors>brightness-contrast. You can see in the screen capture below that I've gone to the task bar above the image, and clicked on "colors", and the flyout menu has dropped down. On this menu, click "brightness-contrast", and have fun. Just remember what I said about "save as". The toolbox is the gray box off to the left of your image. try the diffrent tools in there, see what happens. There is some really cool stuff here.
For instance, the eyedropper tool. Let's say you have some dots or extra pencil lines on your sketch that you want to remove. Go click on the eyedropper tool, then take it to your picture. Find a clean part of the white background, and click there. Now go back to the toolbox, and click on the little paintbrush. Take it to your picture, and start painting over the dots and lines you want to get rid of. They will instantly be changed to the same white as the rest of the picture.
Think what that combination of tools can do in a photo of a horse in a field, where a piece of litter is. You just select a dirt or grass color near the horse, and paint the litter away. Really cool stuff.
